MQTT – Finally!

After a few months of off and on again trying to get my data parse, collect and displayed the way I wanted it. I finally found a little tid bit of info that pointed me in the right direction.

rtl_433 -F “mqtt://192.168.1.15:1883,retain=0,devices=Pipedream/TempSensors/[protocol]/[id]” -M utc

As you can see I am using rtl_433 to receive data from various sensors around the buildings. It gets sent to our MQTT Broker for redistribution to computers that have subscribed to selected topics. Since we have a few sensors of the same model we use [protocol] to group those sensor together, but each sensor has its own feed.

Funny thing is we are now finding sensors, we didn’t know about. We will be watching the data being collected and see if we can figure it out.

Below are the sensors we need to figure out (what they are) 211 and 17. All the rest (so far) we can already id and parse the data correctly.

Finally Posting Data from 433mhz

Would not believe the hoops I had jumped thru to get the data where I wanted it. First 433mhz posts to MQTT, then I have a web page running in a loop, on an old Xserve that reads the data from MQTT. After reading data, it parses the data into CSV files, one for each device. Another web page then uses CSV data to create data blocks.

Could not use CSV directly from MQTT because it would just stop working after the file got so big (32mb I think).. JSON has the same issue, but a bit larger 64mb.

Data is not 100% real time, but it is only, at most 2 minutes or so old for each sensor. Each sensors sends data at its own rate. The receiver, caches and process the data, in batches every 10 seconds. Guess if data comes in during that time it is possible it could get lost, but I don’t think so.

Enjoyed working on this. Really hope to add more sensors and make the data look more sci-fi’ish. But that is for a later date.

UPDATE: In this post, we were using FEEDS by Weaver’s Space, in RapidWeaver. Turned out not to be the best solution for the problem

MQTT – Finally

Finally able to Subscribe and Post Data to a MQTT broker/server.

As always, examples found on the internet, are incomplete, or are just copies of someone else’s post. One of the most popular examples has both Post and Subscribe in one, but of course doesn’t really work without a great deal of review.

Basically you have a server, what they call a broker, that receives all the MQTT traffic., then it allows others to subscribe and monitor the data being posted.

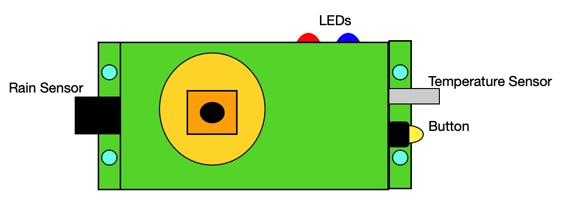
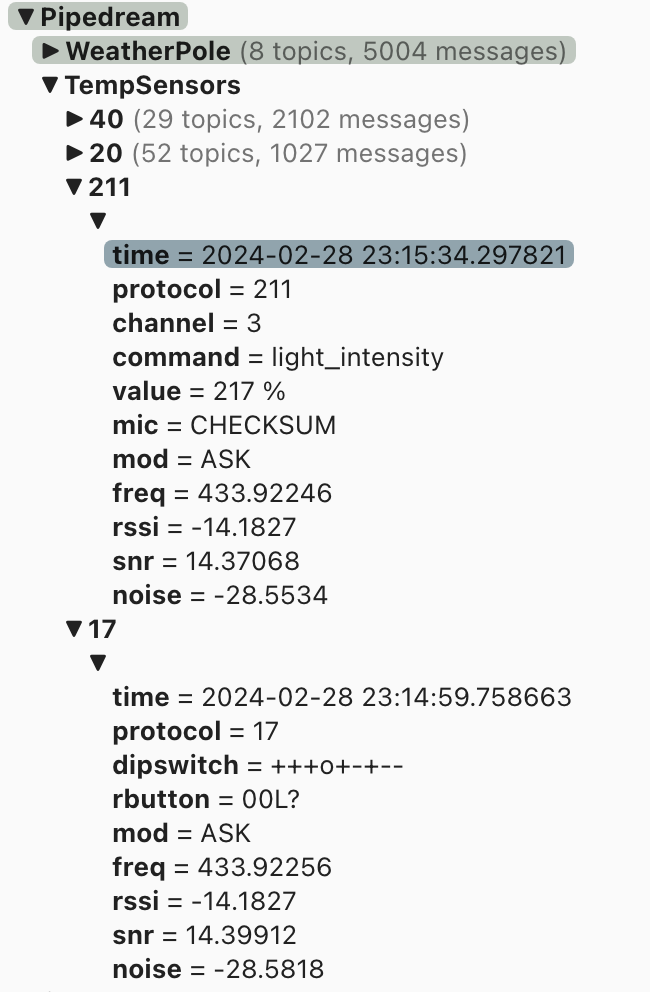
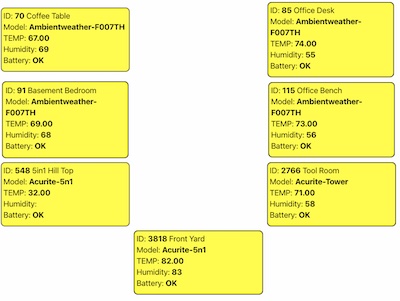
So my setup has a rtl_433 receiver that collects all the sensor data from 433 devices and parses it. Sensors include weather stations, remote temperature, door switches and motion detectors. At present all I am handling is the temperature sensors. Each sensor has an ID which I track, noting it location on the property. Then they also have temperature (of course) and humidity. The sensors sends a lot of other data, but that is all I really need. I then send the data back to broken parsed, into another channel for my use..

The coal is to parse the incoming data into a control panel that will display sensor data, like a dashboard. Basement sensor always in same location, for example. Graphically.

Sensor appear to just send data in a timed manner, once every few minutes. They don’t care if anyone receives it, just throw out over the airwaves. The SDR receives the data, parses it, the Posts to the Broker. The Broken in turn basically doesn’t the same thing as the sensor, it just rebroadcasts the data for anyone that has Subscribe to that Topic. My webpage Subscribes to the Topic and reparses the data and displays it.

Getting there!

So it begins, I hope!

Back in 2010 I purchased a old Jazzy Select Elite wheelchair base, in hopes of using it as a base for a robot. Using that a old Vex robot parts left over from my kids high school days, and winter. Now might be a good time to start.

Jazzy Select Elite

From what I can gather from images and PDFs online, it appears the normal chair, uses two batteries. One for each of the two powered wheels. Increasing power to one, turns the chair on opposite side, kinda like a tank. Will be fun to control with a computer. Mar Rovers use sensors to calculate the amount of turn, need to figure out how to do something in between..

So, planning now.. Will try to keep world updated.

Ventage Computers

As you might know, I’ve been working on computers for awhile. And for the most part I never dump old systems unless they stop working. Did do some housecleaning over the summer, found a few systems that had died. Caused by rust and ‘melting’ foam. Over the weekend I dug out my old Atari 800XL and hooked it up. Worked pretty good, it does have sticking keys… What I found interesting was taking the machine apart, this thing was built like a tank, solid and heavy, not like modern computers..

Basically I can take keyboard apart and clean the leads.. Another weekends project.

Finding a TV to connect the computer was more difficult. I needs a old tuner. Lucky for me the flat screen in my office is older and has a turner..

Having worked in a Atari repair center, I had a demo cartridge and test cartridge.

Reducing number of domains.

Over the years we have acquired a few domain names we thought we’d end up using someday. Some have gone up and value others have not.

So we’ve decided to start cutting down on the number of domain names we have and better combine those we want to keep.

LittleSoftwareBarn.Com is our ‘see us, see what we’ve done’ site.

LittleSoftwareBarn.Net is our locally hosted domain and allows us to interact directly with our internet of thing using local systems.

Other sites that were purchased thinking they would fit a future need, are being let go.

Sites we see as investments, in the name, are being kept.

We will be keeping http://travelingmickey.com it seems very popular, lots of visitors.

And N4N.us we will keep, because we like the WordPress blogging system.

3D Printing, at last.

For years I’ve been trying to find a 3d printer that works reliably and has good support. Started off with a Makerbot kit, which worked well, for awhile. Then Makerbot went crazy with the pricing and went private, so I lost heart in the company.

From there we switched to Solidoodle 3, Supported Solidoodle Press though a kickstarter, took almost two years to receive and NEVER got a good print out of the unit. The unit looked great though. Back and forth with tech support to the point that they wanted me to send back unit for repair. Which I never did, thank goodness. They were out of business weeks later.

A few weeks ago I received notice from Robo, that they were discounting remaining R1+ units, I jumped at it. So far the unit has printed everything I’ve requested, even prints that took 8 hours. A total first.

The units LEDs stopped working, so I contacted Robo, after a few trouble shooting emails, I have new Lights and a have received answers to all my issues quickly and without a lot of template replies. Fantastic printer at low cost.

FlightAware – PiAware

FlightAware was easy to setup and great fun to use. Can track flights flying over your head leaving contrails spoiling your beautiful blue sky. Get the story about a plane and its current flight. Sharing your data with FlightAware gives you free access to their Enterprise plan, well worth it.

Basically you setup a Raspberry Pi, with a ADS receiver which monitors the airwaves for ADS data from flights within range. The area I live in is rather hilly, so at first I wasn’t happy with the units range so I added an external antenna which dramatically increased my systems range. All and all the system cost about $150. You leave it running, then can remotely monitor you PiAware unit over your network through a browser. Plus you can access your data directly from FlightAware’s site, well your data anyway.

Was able to monitor flights in real time.

You can overlay current weather. You can also spend more for better antennas and higher antenna mounting, which would improve your stations reception.

All and all, great fun, nice use of a Raspberry Pi.

UPDATE: After a year of operation the system stopped sending data. Tried a new USB Receiver,  a new Pi, patch cable, nothing worked. Finally changed the power supply, which was on of the nice Raspberry Pi brand ones, with Power LED. That was it, fixed. Unit was getting power, but I guess it wasn’t getting enough. Odd same power supply worked for a year, then just stopped producing enough power. Oh well..

[:en]New Office and lots of networks upgrades.[:]

[:en]Our new world wide headquarters (ROFL), are almost complete. Basically a 14×14 foot office with storage room that doubles as a network room. We have power, AC, network, internet, TV and work areas. Everything a small development company needs. We have programs in development and electronic projects on the boards. Hopefully we’ll be posting more projects soon, though we might start with a few project updates:

  • Our Outdoor Sensor Array, will be connected to our solar panels and updated to our new offices needs.
  • Lighting and sound systems.
  • Network improvements

Hope to be posting again soon.[:]

[:en]IP Power 9258[:]

[:en]Have a need, fill a need.

After losing contact with one of our remote servers, we decided we needed a way to do a hard reboot. We call it ‘cycle the power’. Turn the power off, wait 30 seconds and then power the unit back on. We have had great luck with servers running months even years without issue. Unless they are overloaded or overheated.

Checking eBay for over the counter power controllers, we found the IP Power 9258. Got our first one for less than $70, but most cost between $80 to $120. After looking at programming options and being a MAC Shop we figured it was doable. In less the a week we completed IPPOWER.app. Very small, very simple controller for the IP Power.

First you’ll need the IP Power’s IP number. Using an old PC we first configured ours DHCP, using the included IPEdit. (Read their instructions, which aren’t very well translated to english). We then used LanScan to find the device by its Mac Address.

After you have the IP Power’s IP number, just startup IPPower app, it will ask for the IP Number, administration name and password. The defaults are admin, 12345678.

You can now control the IP Power using keys 1 – 4, clicking on button 1 – 4 or sending “/Applications/IPPower.app/Contents/MacOS/IPPower 4” (4 being the outlet to cycle the power on).

We have also setup iChat to support cycling the power. See the attached AppleScript. Configure iChat to execute the script on message received. The script will look for “outlet1” – “outlet4” as a message. And cycle the power with prompting.

For Apple Mac: ippowerminicontroller[:]