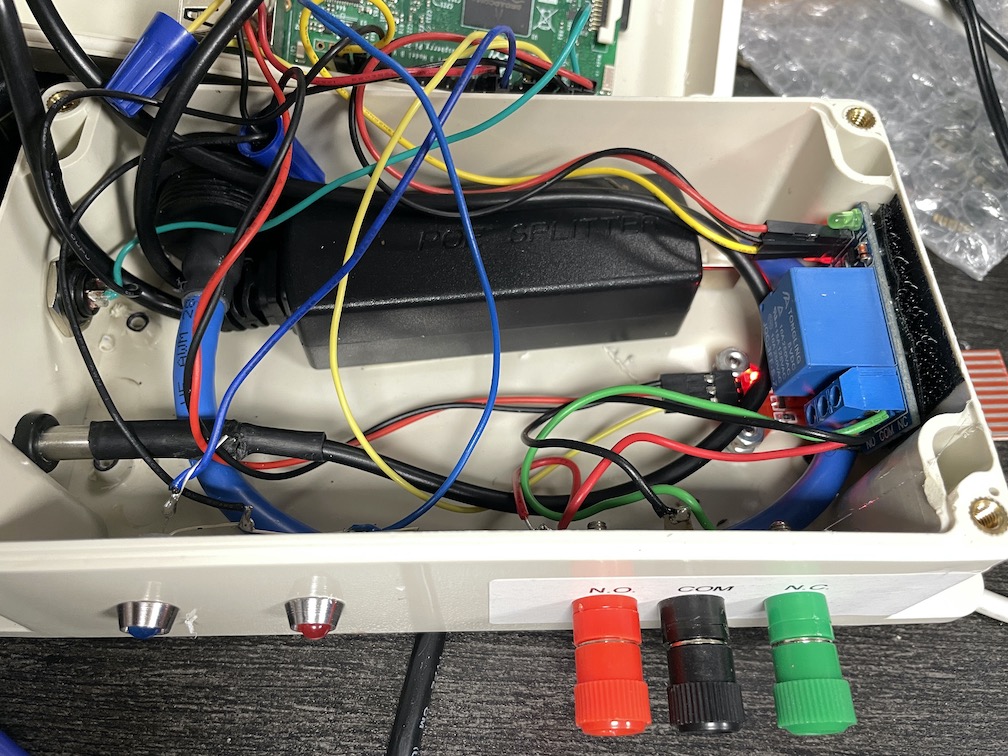
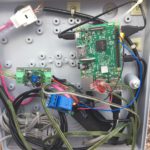
Created a little computer for a co-worker to assist with opening and closing the door to his telescope. Can be controlled by button, rain sensor or even AllSky itself. Hope it works for him.
(Before Geek was Cool)
Created a little computer for a co-worker to assist with opening and closing the door to his telescope. Can be controlled by button, rain sensor or even AllSky itself. Hope it works for him.
After a few months of off and on again trying to get my data parse, collect and displayed the way I wanted it. I finally found a little tid bit of info that pointed me in the right direction.
rtl_433 -F “mqtt://192.168.1.15:1883,retain=0,devices=Pipedream/TempSensors/[protocol]/[id]” -M utc
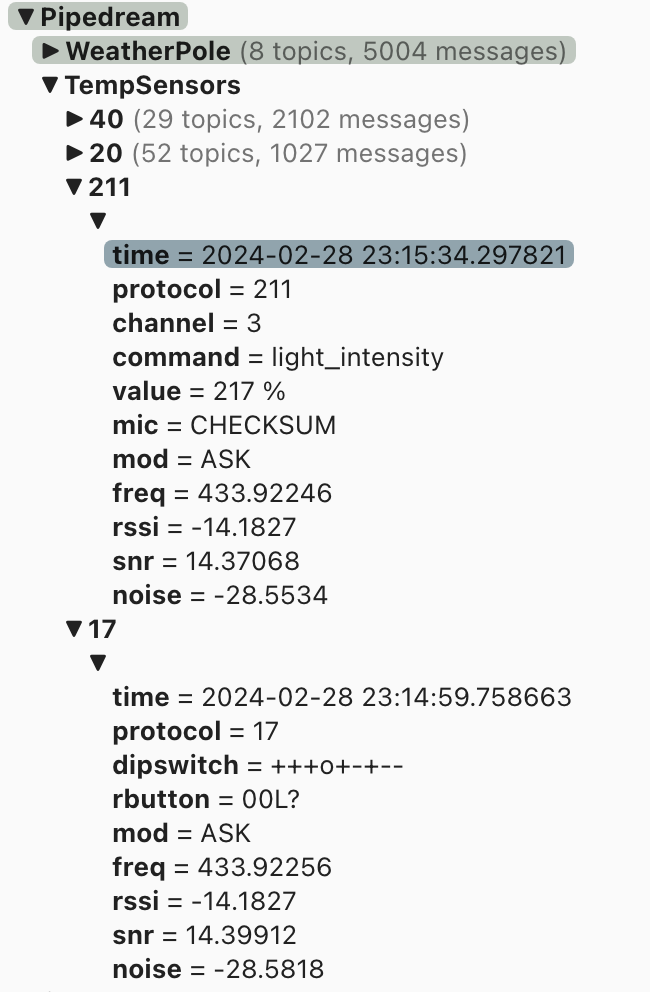
As you can see I am using rtl_433 to receive data from various sensors around the buildings. It gets sent to our MQTT Broker for redistribution to computers that have subscribed to selected topics. Since we have a few sensors of the same model we use [protocol] to group those sensor together, but each sensor has its own feed.
Funny thing is we are now finding sensors, we didn’t know about. We will be watching the data being collected and see if we can figure it out.
Below are the sensors we need to figure out (what they are) 211 and 17. All the rest (so far) we can already id and parse the data correctly.
Would not believe the hoops I had jumped thru to get the data where I wanted it. First 433mhz posts to MQTT, then I have a web page running in a loop, on an old Xserve that reads the data from MQTT. After reading data, it parses the data into CSV files, one for each device. Another web page then uses CSV data to create data blocks.
Could not use CSV directly from MQTT because it would just stop working after the file got so big (32mb I think).. JSON has the same issue, but a bit larger 64mb.
Data is not 100% real time, but it is only, at most 2 minutes or so old for each sensor. Each sensors sends data at its own rate. The receiver, caches and process the data, in batches every 10 seconds. Guess if data comes in during that time it is possible it could get lost, but I don’t think so.
Enjoyed working on this. Really hope to add more sensors and make the data look more sci-fi’ish. But that is for a later date.
UPDATE: In this post, we were using FEEDS by Weaver’s Space, in RapidWeaver. Turned out not to be the best solution for the problem
Finally able to Subscribe and Post Data to a MQTT broker/server.
As always, examples found on the internet, are incomplete, or are just copies of someone else’s post. One of the most popular examples has both Post and Subscribe in one, but of course doesn’t really work without a great deal of review.
Basically you have a server, what they call a broker, that receives all the MQTT traffic., then it allows others to subscribe and monitor the data being posted.
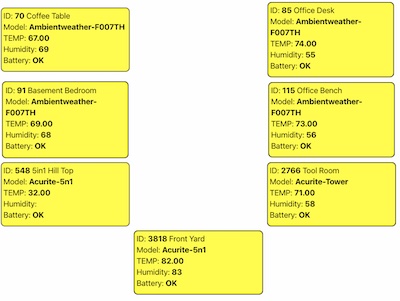
So my setup has a rtl_433 receiver that collects all the sensor data from 433 devices and parses it. Sensors include weather stations, remote temperature, door switches and motion detectors. At present all I am handling is the temperature sensors. Each sensor has an ID which I track, noting it location on the property. Then they also have temperature (of course) and humidity. The sensors sends a lot of other data, but that is all I really need. I then send the data back to broken parsed, into another channel for my use..
The coal is to parse the incoming data into a control panel that will display sensor data, like a dashboard. Basement sensor always in same location, for example. Graphically.
Sensor appear to just send data in a timed manner, once every few minutes. They don’t care if anyone receives it, just throw out over the airwaves. The SDR receives the data, parses it, the Posts to the Broker. The Broken in turn basically doesn’t the same thing as the sensor, it just rebroadcasts the data for anyone that has Subscribe to that Topic. My webpage Subscribes to the Topic and reparses the data and displays it.
Getting there!
All I can say to Wink is, “WTF”!! They have dropped Spotter and Nimbus and now they want to charge $5 a month, FOR WHAT!! I’ve tried to contact them. Had to settle for a contact form asking if they are planning on adding support for Spotter and Nimbus, since they are basically adding nothing, but charging us $60 a year for their service.
Not a happy camper!
| This is a copy of the eMail they sent us: Dear Wink User, Wink’s mission for the past 5+ years has been to provide users with a ‘Simpler, Smarter Home,’ while maintaining privacy for our customers. Our approach to simplicity and security has driven our design from the user experience to the technology behind the scenes. We understand that a smart home is something that needs to be trusted and dependable, and we recognize that recent events have created some uncertainty around the reliability of the system. We apologize for these inconveniences and want to share some background information as well as the path forward. Since 2014, Wink has grown to support more than 4 million connected devices. During this time, Wink has relied solely on the one-time fee derived from hardware sales to cover ongoing cloud costs, development and customer support. Providing users with local and remote access to their devices will always come at a cost for Wink, and over the years we have made great progress toward reducing these costs so that we can maintain that feature. Wink has taken many steps in an effort to keep your Hub’s blue light on, however, long term costs and recent economic events have caused additional strain on our business. Unlike companies that sell user data to offset costs associated with offering free services, we do not. Data privacy is one of Wink’s core values, and we believe that user data should never be sold for marketing or any purpose. We have a lot of great ideas on how to expand on Wink’s capabilities and satisfy the many requests from our user base. In order to provide for development and continued growth, we are transitioning to a $4.99 monthly subscription, starting on May 13, 2020. This fee is designed to be as modest as possible. Your support will enable us to continue providing you with the functionality that you’ve come to rely on, and focus on accelerating new integrations and app features. Should you choose not to sign up for a subscription you will no longer be able to access your Wink devices from the app, with voice control or through the API, and your automations will be disabled on May 13. Your device connections, settings and automations can be reactivated if you decide to subscribe at a later date. Our user community is integral to Wink, and we want to continue to be your trusted smart home provider. Visit subscription.wink.com to subscribe. |
[:en]After a long absences I’ve finally be able to return to my technology projects.
The first one I needed to get out of the way is the weather station. Had built one a few years back, but it was destroyed by an ice storm. Therefore I had to built a new one with a more permanent foundation.
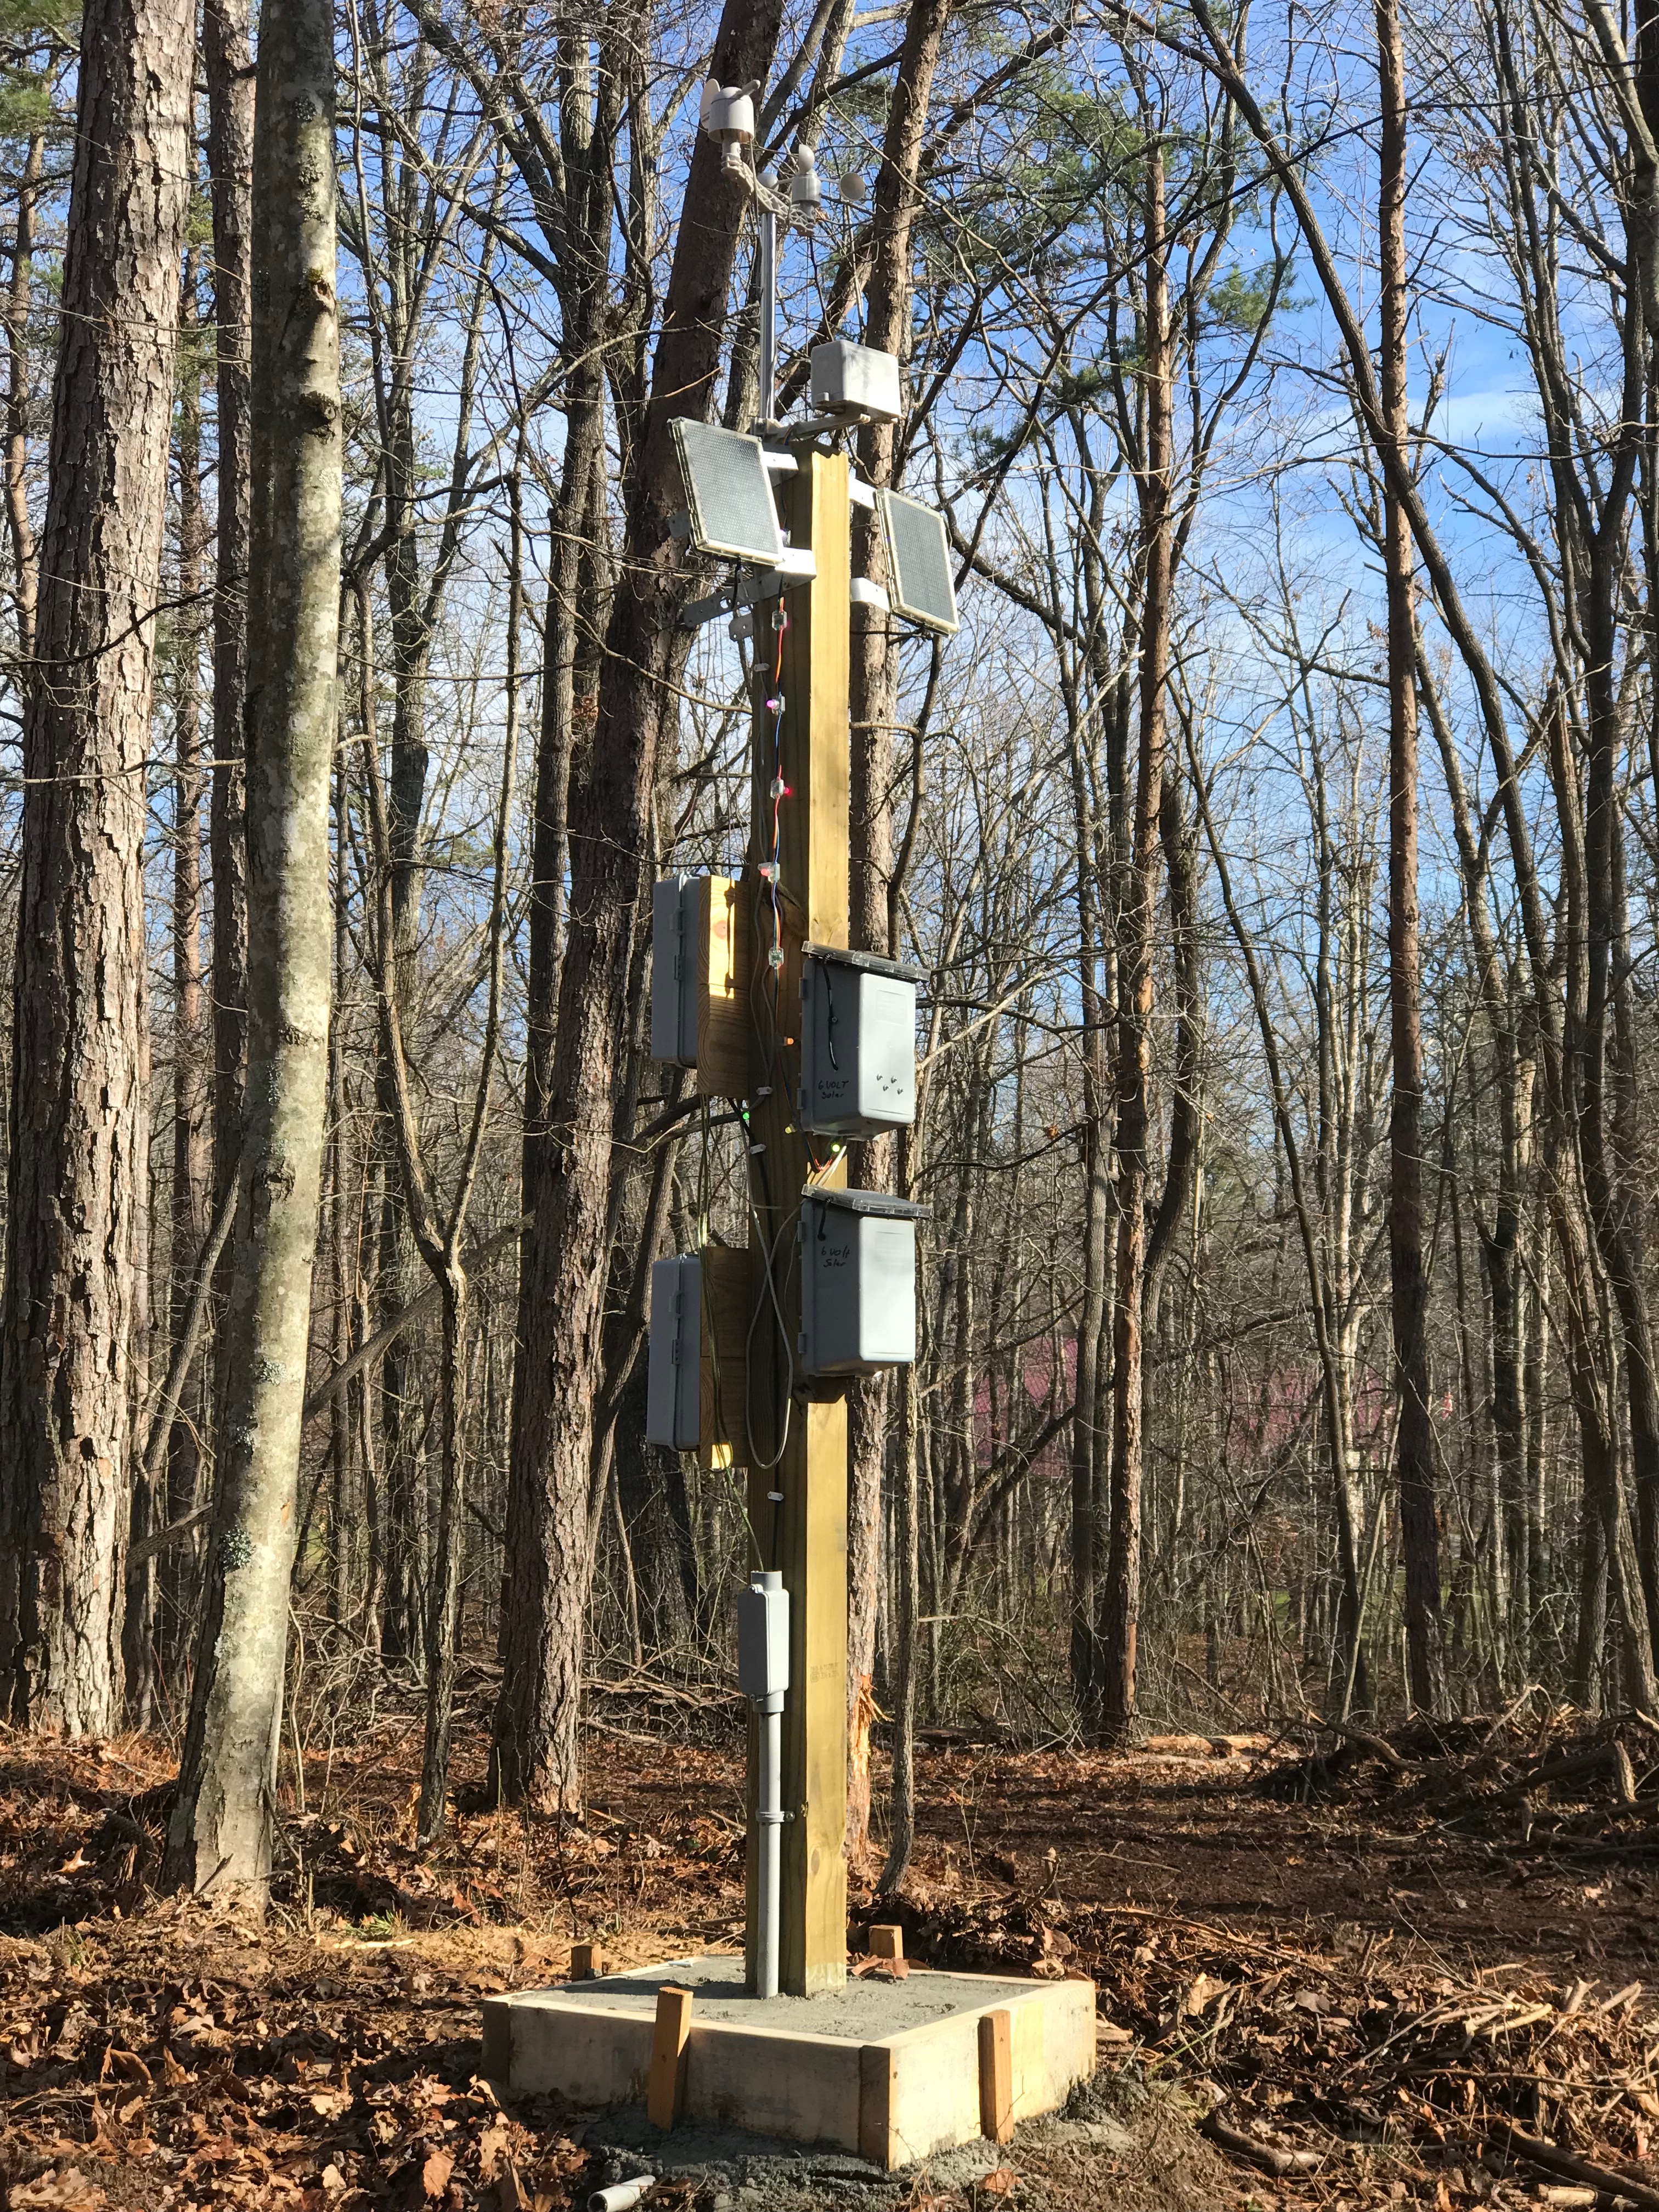
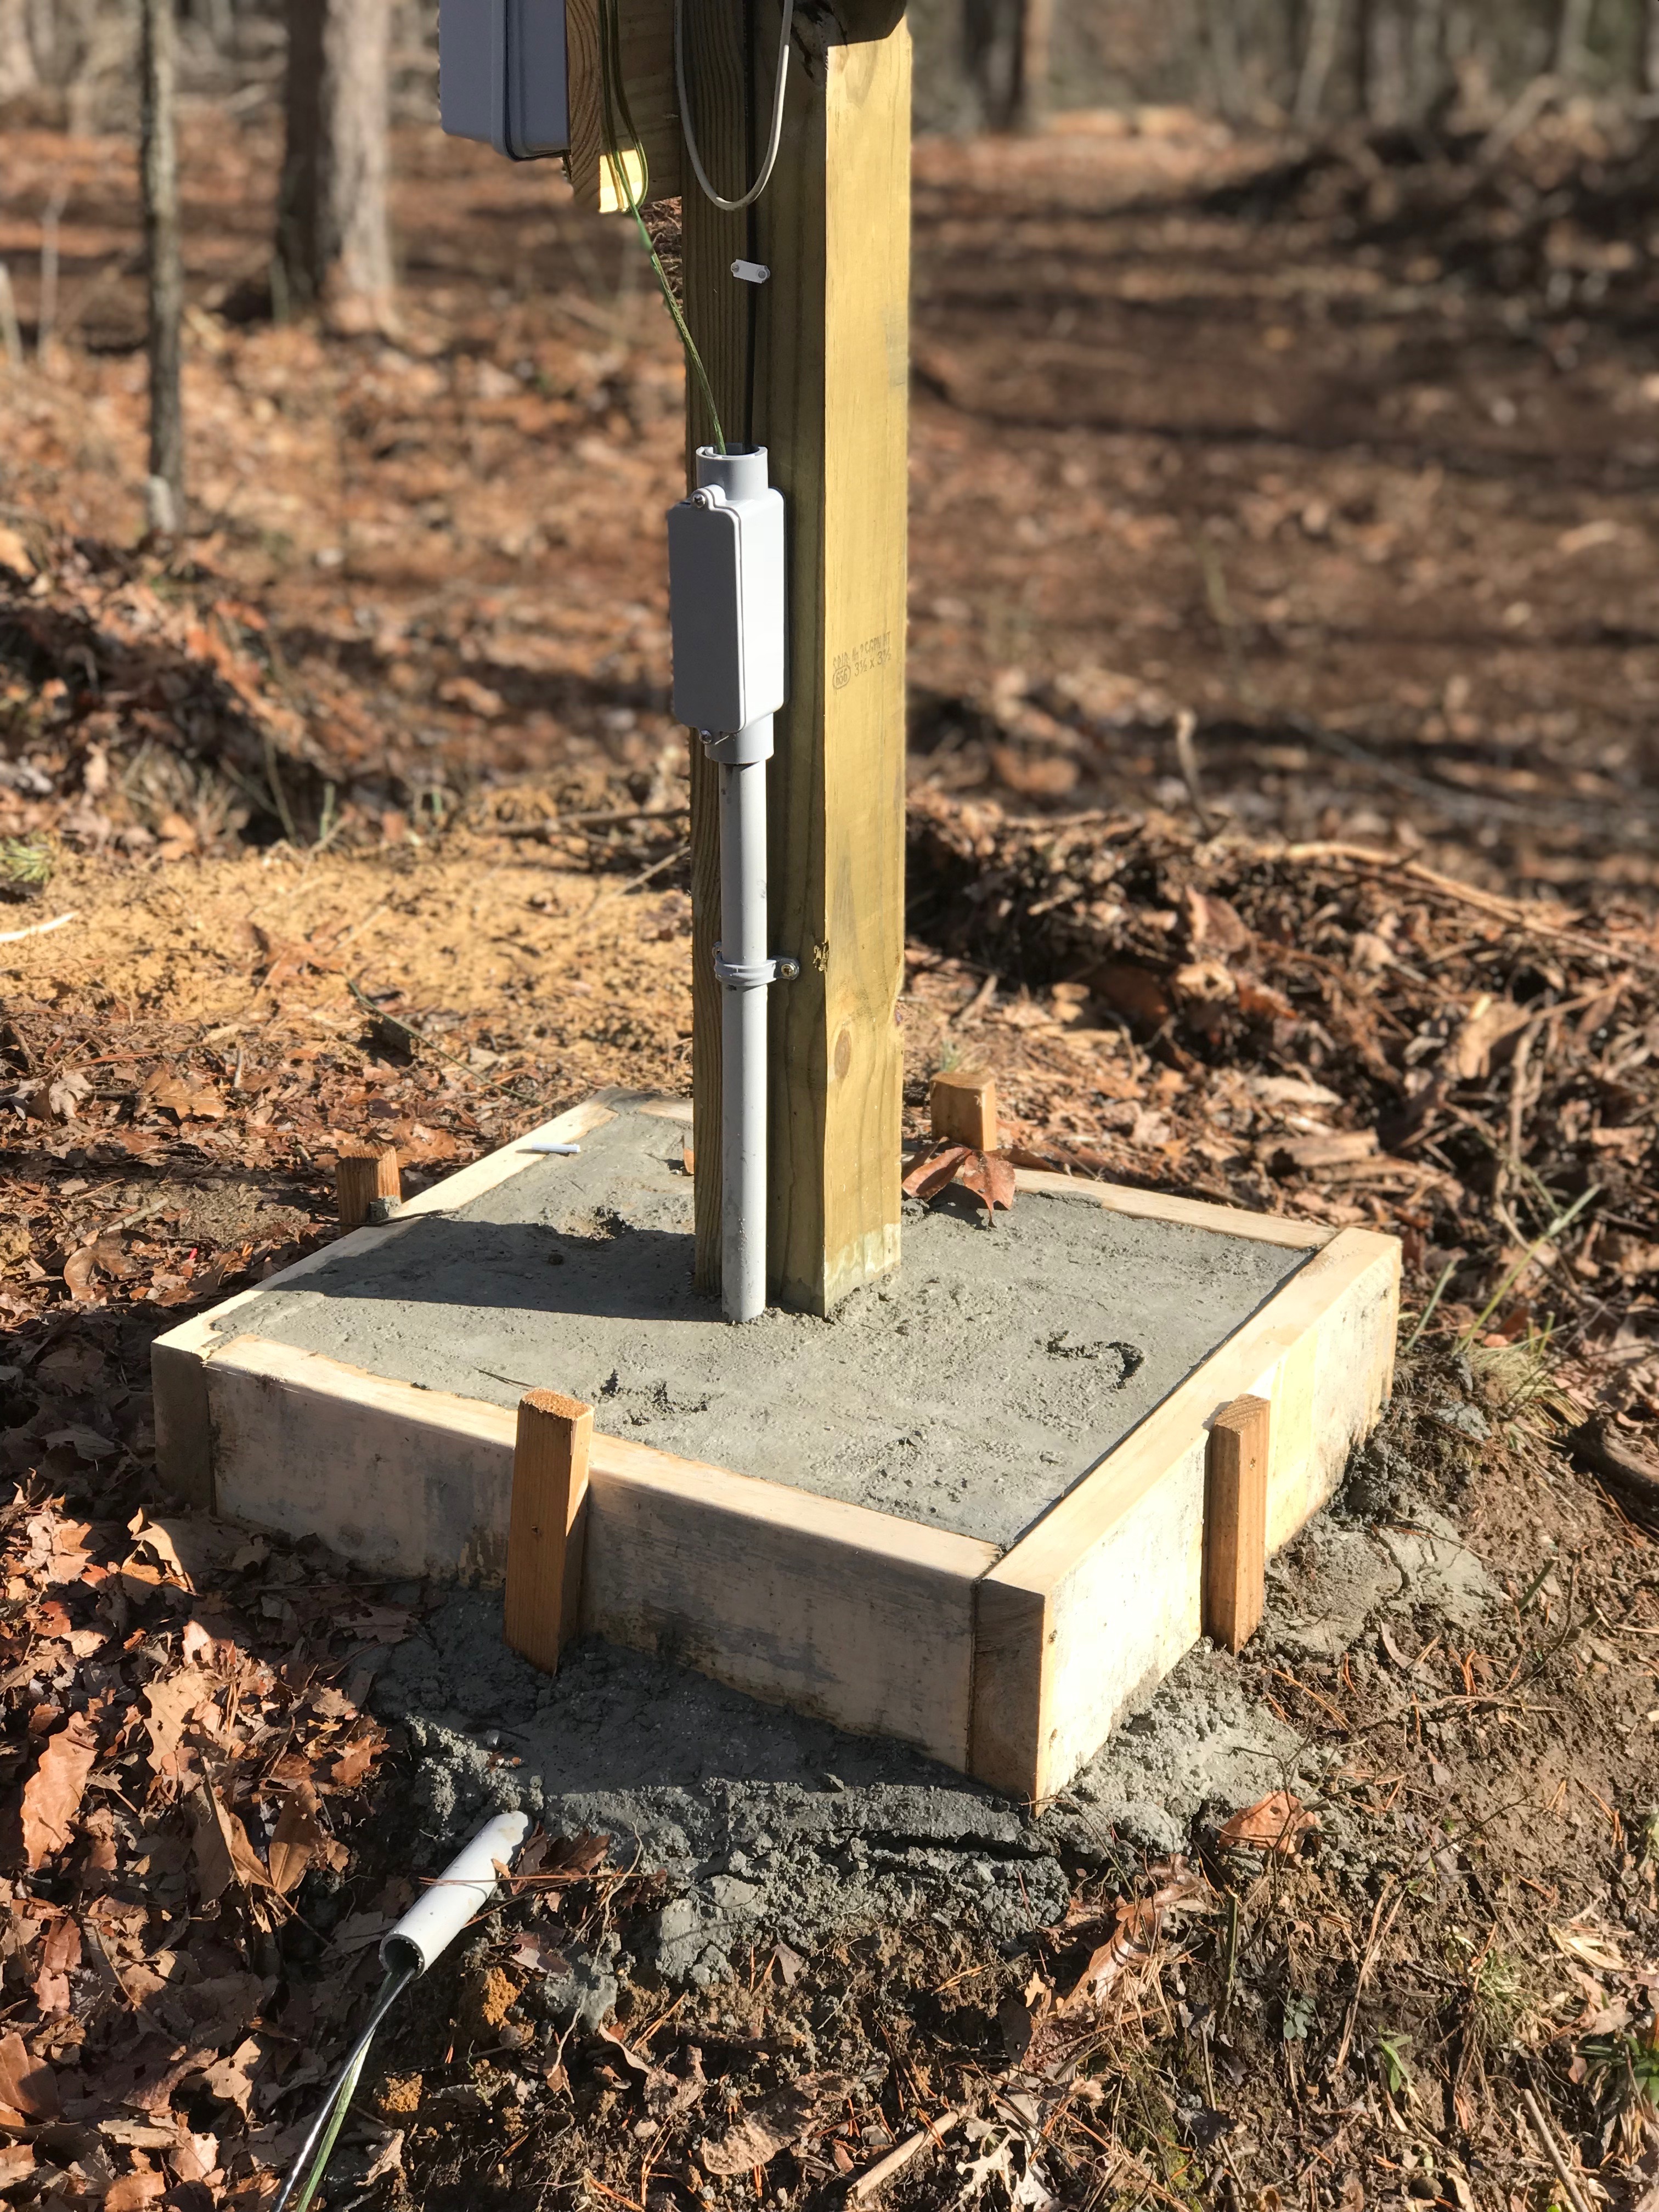
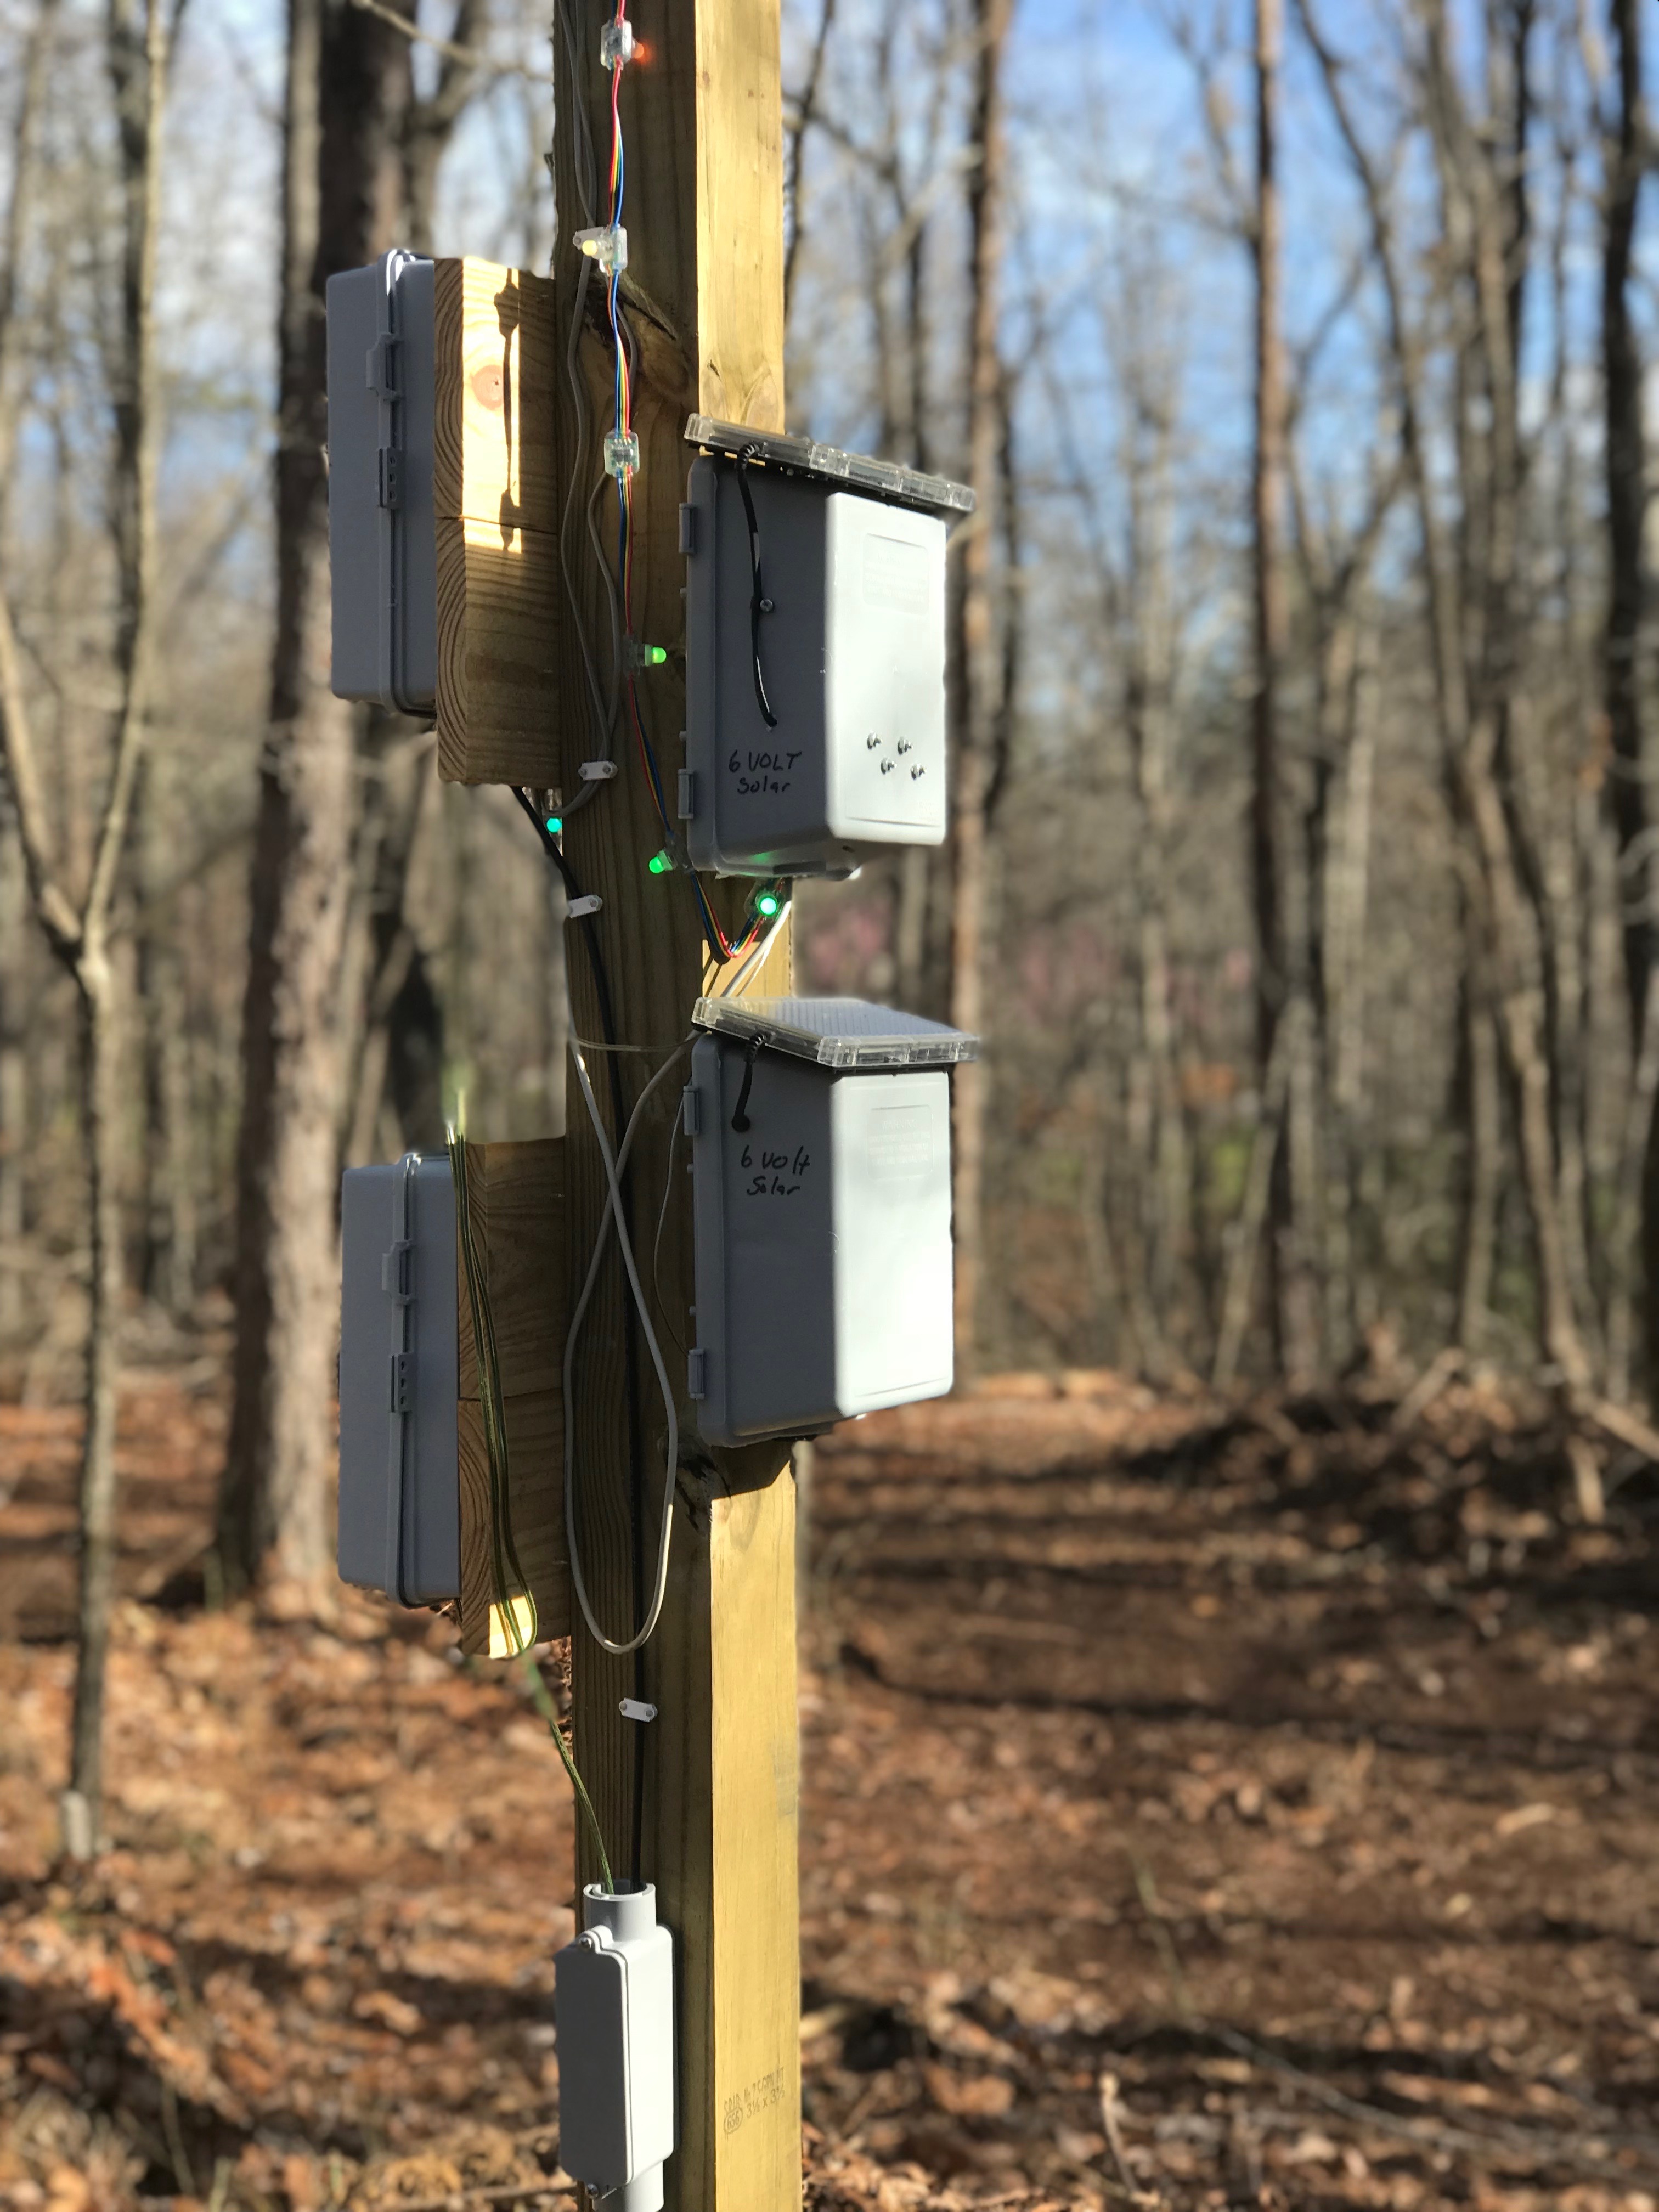
Attempted to make the system completely wireless but somehow no matter what I tried it would be limited in one way or another. So I ended up using a Raspberry Pi that has a UPS board attached to network using a POE adapter. So the Pi gets its power from the network, although the Pi connects to the network wirelessly. And since we had to run one wire, we ended up pulling a 12 volt dc wire also, this allows the addition of more ‘features’ to the pole.
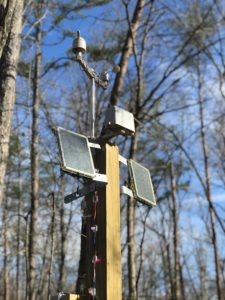
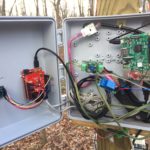
As you can see there are 4 solar panels, 2 – 6 volt and 2 – 12 volt. At this point they are only being used for a string WS 2801 RGB LEDs powered through solar chargers. Sort of controlled Christmas lights. I am attempting to make the LEDs controllable from web site.
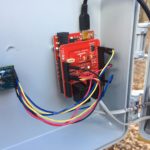
The Weather Station consists of an Arduino with a Sparkfun Weather board and sensor array, with a lightning detector attached. A Raspberry Pi connects to the Arduino and a Relay modular. Currently everything is crammed into a plastic project box mounted on the pole. Will clean it up once new boxes come in.
My neighbors have a hill behind their house, the hill top is about 300 feet away and the hill is maybe 50 feet high. My plan is to add another weather pole on top of the hill, to see how that affects wind and temperature.
[:de]After a long absences I’ve finally be able to return to my technology projects.
The first one I needed to get out of the way was the weather station. Had one, but it was destroyed by an ice storm a couple of years ago. Therefore we rebuilt a new one with a more permanent foundation.
We attempted to make the system completely wireless but somehow no matter what we tried it would limit us one way or another. So we ended up using a Raspberry Pi that had a UPS board attached network using a POE adapter. And since we had to run one wire, we ended up pulling a 12 volt dc wire also, this allows us to add more ‘features’ to the pole.
As you can see there are 4 solar panels, 2 – 6 volt and 2 – 12 volt. At this point they are only being used for a string WS 2801 RGB LEDs powered through solar chargers. We are also attempting to make the LEDs controllable from web site.
The station consists of an Arduino with a Sparkfun Weather station and lightning detector attached. A Raspberry Pi connects to the Arduino and a Relay modular. Currently everything is crammed into a plastic project box mounted on the pole. Will clean it up once new boxes come in.
[:]
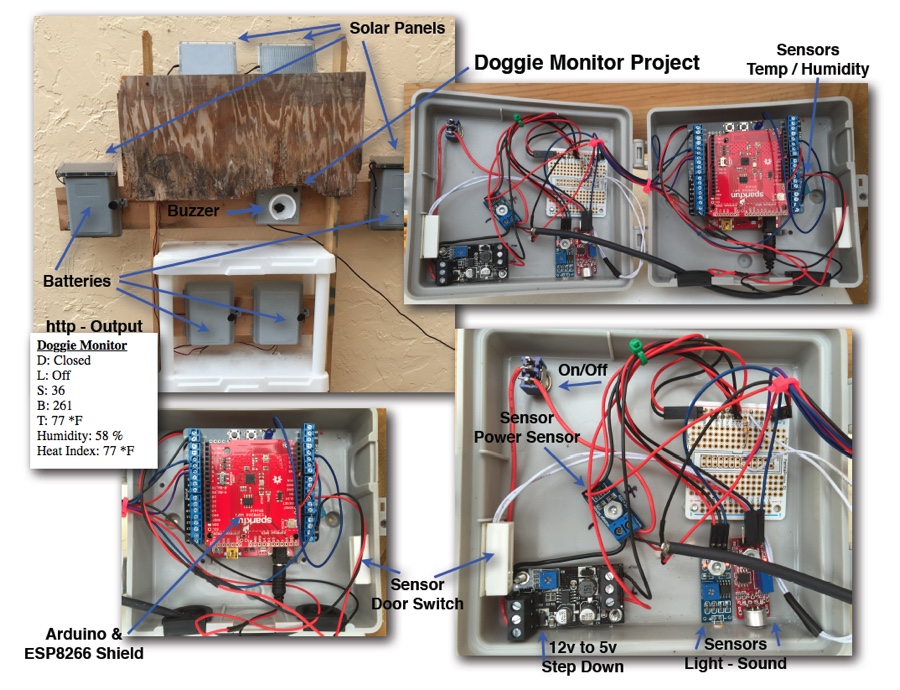
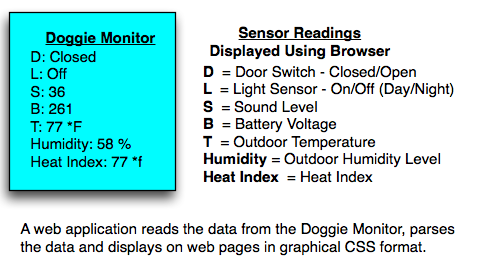
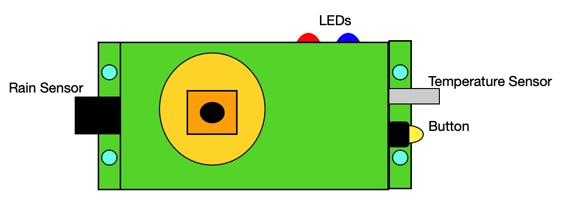
How many sensors can we plug into one Arduino and setup outdoors? This is how many I was able to cram into one Project Box.
The system uses a ESP8266 Wifi / Arduino Card with a screw terminal Shield. — I attempted to run it all with two 12 volt solar panels with a solar charger. Didn’t have enough juice, so ended up just plugging into outlet located outside.