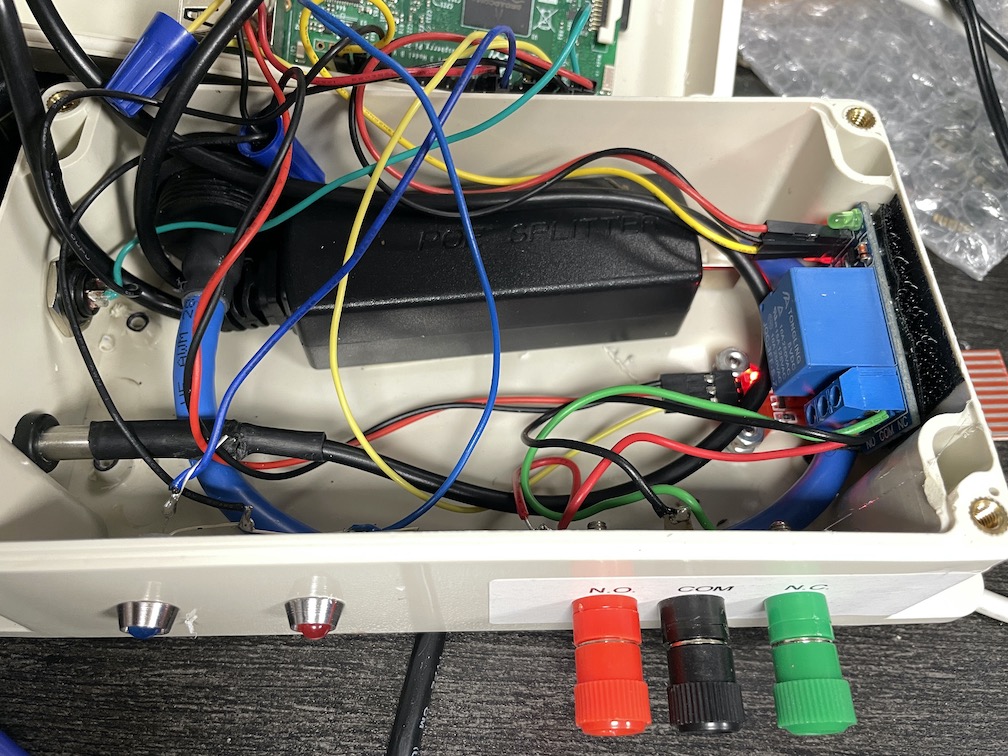
Created a little computer for a co-worker to assist with opening and closing the door to his telescope. Can be controlled by button, rain sensor or even AllSky itself. Hope it works for him.
(Before Geek was Cool)
Created a little computer for a co-worker to assist with opening and closing the door to his telescope. Can be controlled by button, rain sensor or even AllSky itself. Hope it works for him.
After a few months of off and on again trying to get my data parse, collect and displayed the way I wanted it. I finally found a little tid bit of info that pointed me in the right direction.
rtl_433 -F “mqtt://192.168.1.15:1883,retain=0,devices=Pipedream/TempSensors/[protocol]/[id]” -M utc
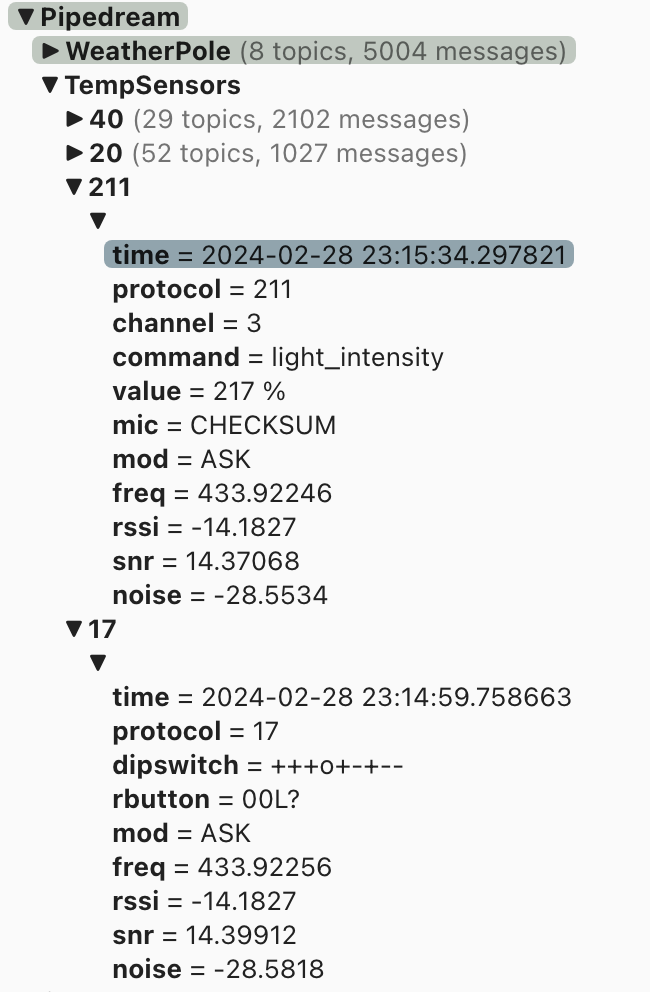
As you can see I am using rtl_433 to receive data from various sensors around the buildings. It gets sent to our MQTT Broker for redistribution to computers that have subscribed to selected topics. Since we have a few sensors of the same model we use [protocol] to group those sensor together, but each sensor has its own feed.
Funny thing is we are now finding sensors, we didn’t know about. We will be watching the data being collected and see if we can figure it out.
Below are the sensors we need to figure out (what they are) 211 and 17. All the rest (so far) we can already id and parse the data correctly.
Finally able to Subscribe and Post Data to a MQTT broker/server.
As always, examples found on the internet, are incomplete, or are just copies of someone else’s post. One of the most popular examples has both Post and Subscribe in one, but of course doesn’t really work without a great deal of review.
Basically you have a server, what they call a broker, that receives all the MQTT traffic., then it allows others to subscribe and monitor the data being posted.
So my setup has a rtl_433 receiver that collects all the sensor data from 433 devices and parses it. Sensors include weather stations, remote temperature, door switches and motion detectors. At present all I am handling is the temperature sensors. Each sensor has an ID which I track, noting it location on the property. Then they also have temperature (of course) and humidity. The sensors sends a lot of other data, but that is all I really need. I then send the data back to broken parsed, into another channel for my use..
The coal is to parse the incoming data into a control panel that will display sensor data, like a dashboard. Basement sensor always in same location, for example. Graphically.
Sensor appear to just send data in a timed manner, once every few minutes. They don’t care if anyone receives it, just throw out over the airwaves. The SDR receives the data, parses it, the Posts to the Broker. The Broken in turn basically doesn’t the same thing as the sensor, it just rebroadcasts the data for anyone that has Subscribe to that Topic. My webpage Subscribes to the Topic and reparses the data and displays it.
Getting there!
Was one of the founders and long time supporter of DAUG. We had a vast collection of shareware and freeware that we would exchange with our members. In trying to keep things interesting and get more people into programming I would try to write a new Menu for each new disk. Showing off Atari features and new things we learn about your computers.
I’ve been trying to find my old friends from those day, to see if I could convert the library over to emulator usable files, so if you are one of those people, please reach out to me.
Never been a big fan of WordPress, but I am going to try and provide a link to the file, an image of the menu and a list of the files on the disk.
Back in the early 90’s I programed in Microsoft QuickBasic, and after that I started using Visual Basic, then finally I’ve been using LiveCode.
Just for laughs I started building a machine able to run DOS 6.55 and Windows 3.1, brings back memories. After a couple of months assembling the needed parts I finally got the tiny HP T5000 running. It was like an old friend.
It took some time to reacquaint myself with the OLD and how I setup the computers back in the day. I was impressed, my code and batch files were commented and easy to follow. The things we did with serial communication and NO Networking. The newer programs had limited networking, but nothing we find on today systems.
There were full collections of QuickBasic libraries, with manuals, ranging from “windows” and dBase III, speech and even code to create background functions. Those were the days, one person could provide a whole company with software that wasn’t filled by off the shelf programs. All customized for their needs.
Lately I’ve been also revisiting PowerShell and the power of Active Directory, having adding both a Windows Server configured as a Domain Controller and a few Windows 10 machines as Clients. Trying to get both the old and new to communicate has been, frustrating.
Was thinking about using Jabber, or XMPP, to issue small commands to a server/controller/monitor. But as with all projects of this nature, it seems I busted my server by installer a newer version, that wasn’t supported by the hardware I have. Oh well, time to rethink and reproach what I am trying to do.
One of the most difficult problems I’ve attempted to resolve in the last few years, is how to capture and record (into mysql database) data received from 433mhz sensors..
rtl_433 -M utc -F json -G
{“time” : “2019-09-25 19:11:54”, “model” : “Acurite tower sensor”, “id” : 2766, “sensor_id” : 2766, “channel” : “A”, “temperature_C” : 22.700, “humidity” : 44, “battery_low” : 0}
{“time” : “2019-09-25 19:12:01”, “model” : “Acurite Lightning 6045M”, “id” : 253, “channel” : “A”, “temperature_F” : 72.100, “humidity” : 41, “strike_count” : 26, “storm_dist” : 27, “active” : 1, “rfi” : 0, “ussb1” : 0, “battery” : “OK”, “exception” : 0, “raw_msg” : “c0fd6fa9d12d9a1b88”}
{“time” : “2019-09-25 19:12:04”, “model” : “Smoke detector GS 558”, “id” : 8078, “unit” : 14, “learn” : 0, “code” : “63f1ce”}
Trying to parse and collect the data using LiveCode has proven to be difficult. First problem with rtl receiver, is it isn’t seen as a com port, or other readable device. It is seen as its own terminal device. I’ve tried piping, didn’t work. Basically everything I’ve tried, hasn’t worked.
The best advice I have received to is send data out to flat file, then read the file. Which basically mean lots of file activity and parsing. Unsure if I am willing to do that for what should be a simple task. That would cause a great deal of read/write activity on the SD drives and possibly wear out the drive faster.
Heard of a new program that outputs the data to files specific to the device id, trying to find it. Will keep everyone informed.
Got a job writing a program to track a client’s, client’s. Can’t go into do much detail. But it is reawakened the joy of Programming in LiveCode again. LiveCode is up to version 9 now, haven’t done any major projects in it since version 6. SO, lots of new features and changes. Having to relearn a few things. This project will be using SQLite, which I haven’t used in a LONG time, but so far going fairly well.
UPDATE: You can see what the finish project looks like on LittleSoftwareBarn.com, Projects >> Boat tracker. Project took under two weeks to complete.
[:en]Have a need, fill a need.
After losing contact with one of our remote servers, we decided we needed a way to do a hard reboot. We call it ‘cycle the power’. Turn the power off, wait 30 seconds and then power the unit back on. We have had great luck with servers running months even years without issue. Unless they are overloaded or overheated.
Checking eBay for over the counter power controllers, we found the IP Power 9258. Got our first one for less than $70, but most cost between $80 to $120. After looking at programming options and being a MAC Shop we figured it was doable. In less the a week we completed IPPOWER.app. Very small, very simple controller for the IP Power.
First you’ll need the IP Power’s IP number. Using an old PC we first configured ours DHCP, using the included IPEdit. (Read their instructions, which aren’t very well translated to english). We then used LanScan to find the device by its Mac Address.
After you have the IP Power’s IP number, just startup IPPower app, it will ask for the IP Number, administration name and password. The defaults are admin, 12345678.
You can now control the IP Power using keys 1 – 4, clicking on button 1 – 4 or sending “/Applications/IPPower.app/Contents/MacOS/IPPower 4” (4 being the outlet to cycle the power on).
We have also setup iChat to support cycling the power. See the attached AppleScript. Configure iChat to execute the script on message received. The script will look for “outlet1” – “outlet4” as a message. And cycle the power with prompting.
For Apple Mac: ippowerminicontroller[:]
[:en]Nice perk of my current job is that we are allowed to spend time creating time saving programs. Within reason!
After getting an unusual number of reports of broken keyboards we decided we needed a quick easy way to test keyboards. Using mostly Apple iMacs, that is what we wrote the program for. BUT it works pretty good on windows as well (numerical keypad has issues though, but useable).
Spent less than a day creating the DIY Keyboard Tester using LiveCode.
Keyboard Tester Mac: diykeyboardtestermac
Keyboard Tester Windows: diykeyboardtesterwin-exe
[:]
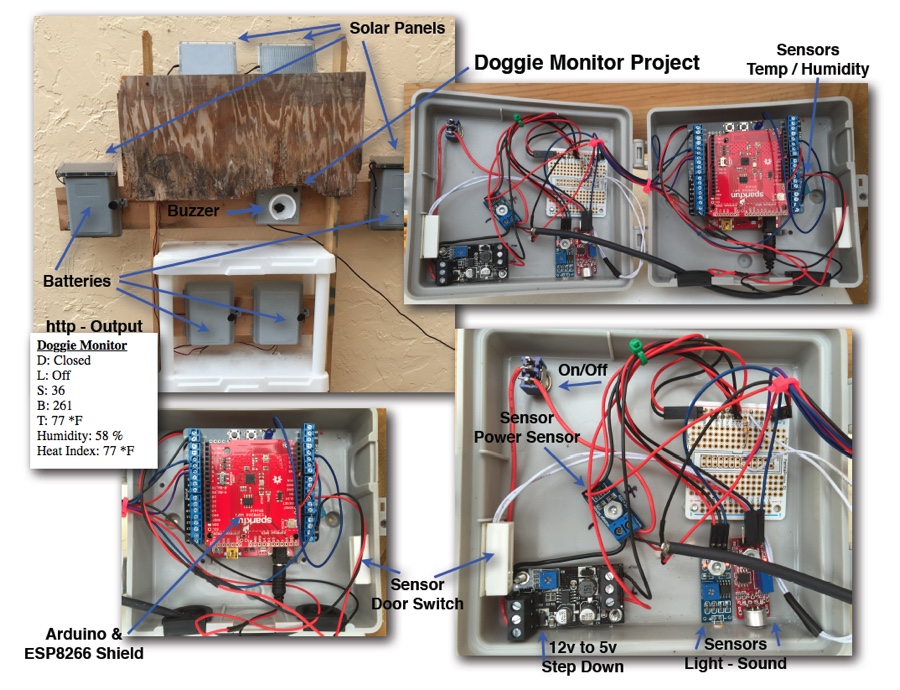
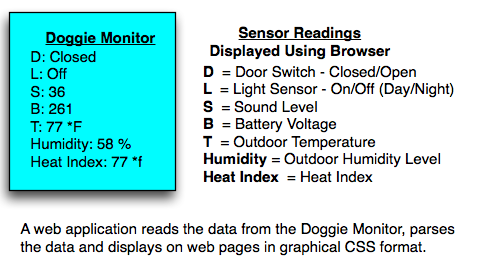
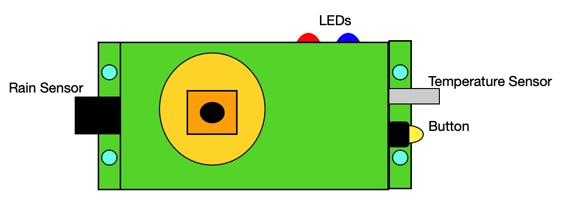
How many sensors can we plug into one Arduino and setup outdoors? This is how many I was able to cram into one Project Box.
The system uses a ESP8266 Wifi / Arduino Card with a screw terminal Shield. — I attempted to run it all with two 12 volt solar panels with a solar charger. Didn’t have enough juice, so ended up just plugging into outlet located outside.